Related Posts Widget for Blogs by LinkWithin
Showing posts with label this young house. Show all posts

Monday, November 10

The Anatomy of a Wall Collage


I love a good collage. Mixing prints, textures and colors is a general theme around our home. And  whether small or large, a good wall collage adds personality and depth to any room. Here are some of my tips for achieving your perfect mix. 


1. Make it personal
Use items from your life - your wedding, your adventures, meaningful quotes -- something from your favorite novel, a line or two of poetry or even an entire poem, or song lyrics -- perhaps the song you danced to at your wedding, or the one your mother used to sing to you as a child.

2. Find a common theme
Make one element of the collage cohesive  -- perhaps a color story {I went with neutral colors in my living room collage}, using the same frame for each piece, a wall of only poetry or song lyrics, pictures from your honeymoon or a favorite trip. Find something that ties a common thread between all pieces.


3. Plan it out
I like to lay the collage on the floor to get the perfect arrangement, then cut out shapes from paper that match each piece. Lightly tape each piece of paper to the wall and tweak the placement as needed. It may seem like extra work, but I guarantee you it is far easier than rearranging things after you've already made holes in the wall. I especially suggest this if you are trying to hang multiple things in one straight line.

4. Don't be afraid to switch it up
Changing out pieces in the collage helps keep things fresh, especially during the holiday season. I like to add silver Christmas balls to the antlers in our living room or string garland across the frames to make them more festive. Also, if you find another piece of art that you love, find a way to incorporate it into your collage.


xoxo

copyright Hiking in Stilettos

Tuesday, September 30

A Weekend in Pictures


I feel like every weekend I try to soak up as much time with husband and E as I possibly can. The weeks are usually pretty hectic with work schedules, making dinner and bedtimes, so carefree time together is so precious to me. We spent the weekend at home, simultaneously saying goodbye to summer and hello to fall. We dined al fresco on our patio, sipped on white sangria, swayed in the hammock swings and talked about history, science and upcoming adventures. We stayed in our pajamas a little longer, left the beds unmade and made paleo waffles (as has become our weekend custom), and played in the dirt. We went for a long walk on the wooded trails and dreamed of all kinds of things.


I wish weekends could last forever. 
xoxo

Sunday, September 28

Fall Colors + Front Porches


I mentioned last week that I wanted to spend some time cleaning and updating our outdoor spaces to bring a bit of fall, and this weekend I was able to do just that! My dear mama came over on Friday to lend me a hand (I'd be lost without that woman. #thankGodformoms, can I get an amen?) and we set to work arranging mums, scavenging for branches and doing some good old fashion piddling. (That's Southern for rearranging/decorating if you're stumped.) I am beyond pleased with the simple, rustic result and the red, orange and purple hues of the coming season. Elliot and I spent the majority of Saturday on the porch swing enjoying the breeze.


A quick tip about the mums that my wise mama passed down to me: leave them in their plastic containers instead of actually planting them in pots! You can surround them with dirt (see the pot to the right of the front door) or just place in a larger container. They will be fine for the month or so that they are out on the porch, then I will plant them in a flower bed beneath Elliot's window. The ones from the past two years have come back and are flourishing!


Happy porch weather!
xoxo

copyright Hiking in Stilettos

Sunday, March 9

Spring Fever // The Home Edition


The warm sunny days filling the weekends lately have put me into serious cleaning and organization mode. Like every other home owner I know, I have a laundry list of projects, updates and DIYs for our house. Unfortunately, being nine months pregnant hinders some of these projects, so I've turned my attention to the things I can currently complete. Husband recently helped me update our couch's end tables via this Ikea hack, and I am so pleased with the end result. Now my sights are set on updating the rest of our living and dining room furniture and revamping our front entrance... and perhaps completing a few outdoor projects along the way! 

Antler Water Hose Hook {I think husband can make this}
Bleecker Side Chair - Jonathan Adler for JCP
Walton Sofa - West Elm

I've been eyeing dining room chairs for a while, and these Jonathan Adler ones are pretty perfect with the wooden base and nail head trim. Also for the dining room, I think some industrial wood shelving would make a neat alternative for a bar or bar cart. As for our patio, I'd like to make some simple modern planters to house some of our favorite plants and make a cool garden hose hanger for the side of the house since the current one is an eyesore.

Do you have any spring projects or updates in mind?
{All products and links can also be found here.}
xoxo

copyright Hiking in Stilettos

Monday, April 15

This Young House: Building a Hairpin Leg Bench


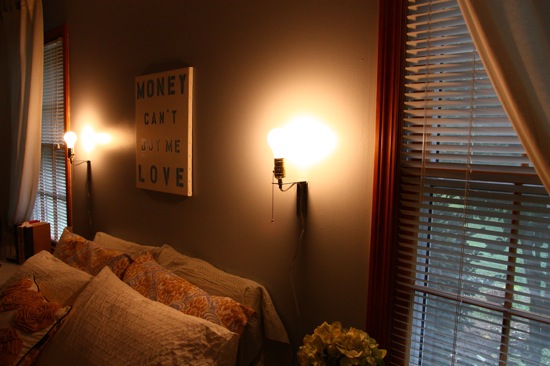
Our master bedroom is one of the only rooms in our home that is close to being finished. Aside from large projects like exchanging our horrid green carpet for hardwood floors, painting the trim and upgrading our nightstands to something more our style, the room is just what we wanted -- a {headboard-less} low bed, industrial lighting, unique and meaningful artwork. One of the few remaining projects we had was to build a bench for the foot of our bed. We were originally looking for something at our local antique and thrift stores, but nothing was exactly what we wanted, so we decided to build the simplest version of our vision.

You will need:
1 - 12 inch x 5ft x 1&1/2in board*
a small can of stain or polyurethane**
4 - 17inch hairpin legs***
12 - 1&1/4 inch screws


Sand, stain and seal the wood to your desired color and let dry overnight. Assembling the legs is quite simple. Lightly attach two legs on opposite corners, then turn the bench over and place the remaining legs underneath to see if and where they are uneven. {This step requires a second pair of hands!} Use the supplied spacer on the leg that is uneven. Attach the remaining legs and secure tightly. Viola!


xoxo

Other considerations...
*Our bed is about 5feet wide so we chose to make the bench the same length. If you want something longer, use a longer length board
- - - - - - - - - - - - -
**If making an outdoor bench, including one you may place on a deck or front porch, be sure to use indoor/outdoor or outdoor stain to protect against rain.
- - - - - - - - - - - - - 
***Obviously, the height of the legs will depend on how tall you need the bench to be. We wanted ours just slightly lower than our bed, so 17inch legs worked perfectly. 

copyright Hiking in Stilettos 

Wednesday, January 9

This Young House: How to Build a Farm Table


When husband and I moved into our home, one of the first projects we wanted to tackle was our dining room table. We had a hand-me-down that had been painted a few times and was really quite small, so an upgrade was in order. Since we weren't prepared to spent a couple thousand dollars for a farm table and chairs, we decided to make one ourselves.The styles we liked were relatively simple in design, so we headed out to our local ACE Hardware and picked out some lovely cedar with only a vague plan in mind.

What we used:
4 - 12x2x66 cedar planks {table top}
4 - 4x4x36 cedar posts {legs}
4 - 1x2x36 cedar boards {reinforcements}
8 - L brackets
1&1/2 inch wood screws
wood glue {optional}

After we cut the boards to the appropriate lengths, we sanded them and placed clear coat on each piece to protect and set the wood. The next day we got to the building! 

Step 1: Place top boards upside down on a tarp and use tie-down straps to hold the them tightly together.
{You could also use some wood glue here to help keep the boards together. We chose not to because we actually like the aesthetic of the boards being just slightly apart.}

Step 2: Connect the legs to the braces.
{This allows you to not place visible screws into the table top.}


Step 3: Attach the legs/braces to the table top and reinforce with L-brackets.
{We also placed L-brackets against the legs and brace wood for added support.}

Repeat steps 2&3 at the other end on the table.
Step 4: Place two more brace pieces evenly underneath the table and secure with screws.
Step 5: Flip the table over, move it inside & make a centerpiece!


Our next step is finding eight chairs that we love... within our price range.

Happy carpenter-ing.
xoxo

copyright Hiking in Stilettos

Monday, December 24

Deck the Halls


Christmas decorating was special this year, since this is our first Christmas in our new {to us} house. It was fun to finally pull out the things I've been saving for the last few years -- vintage ornaments from my grandmother, garland and lights for the doorway -- and deck the halls of our new home for the first time.


We went to a local tree farm and cut our first real Christmas tree. I used a piece of burlap as a tree skirt, and we trimmed away with ornaments I've collected over the past few years. For the mantle, white candles and greenery are festive, yet simple. I filled milk glass vases of different sizes with cypress clippings for the Christmas Eve table.


Merry merry Christmas to you.
xoxo

copyright Hiking in Stilettos

Thursday, September 20

DIY Industrial Sconces


One of the things I am excited to share with you is the process of recreating our new-to-us home. Admittedly, the place is dated and a little too country for our liking, but it's nothing a few gallons of paint and some elbow grease can't fix. So, I've come up with a 'This Young House' series which will highlight some of the things we are doing {or having done when it's beyond our skill level}. Naturally, we have a laundry list of projects, large and small, but we've decided to start with the small ones and work on just a couple rooms at a time... but more on that later.

One of the first areas we decided to tackle was the master bedroom. We want the space to feel calm and almost cave-like while still seeming airy and welcoming. For us that means a neutral color palette, layers of linens on the bed, and a few meaningful, dramatic details.

As for lighting, we decided on sconces versus table lamps to save precious bedside real estate for books and water glasses. Most of the sconces we liked were on the pricier end, so we decided to recreate a version of these. The process was really quite simple once we figured out what supplies we needed. 


Supplies:
two steel brackets {not shown above}
two lamp sockets
two lamp cords
a pack of steel nipples {no snickering}
a back of hex nuts

Other master bedroom projects:
- WALL ART: I'm waiting for the autumn/winter collection of these decals. I want to place the decal on a piece of old wood stained the same color as our imaginary bench.
- PAINT: While we've already painted the walls what we thought was a silver grey, a darker slate grey will be going up in a few weeks.
- A BENCH: We are building a bench for the foot of the bed out of some leftover wood and hairpin legs.
- HARDWOODS: As I've mentioned before, the carpet in this room is heinous. Simply heinous, people.
- {FAUX} COWHIDE RUG: We're envisioning a unique, dramatic rug to place under the bed after our hardwoods make their appearance.

More home improvement projects are on the way. There are so many!
Happy Friday.
xoxo

copyright Hiking in Stilettos

Tuesday, May 29

Managing the Mantle


favorite themes: layered art, empty frames, alphabet 

One of my favorite features in our new home is the dramatic brick fireplace in our living room. The open floor plan of the living area, the layout of the entryway, and the central location of the fireplace make it an obvious focal point in the room. In it's current state, the mantle needs a bit of love. I plan to paint it a pale grey and to remove the heinous gold cover {it's straight from the 90s}, but I haven't decided on how to decorate yet. In our previous apartment, I had meaningful artwork and pictures on our mantle but frequently changed decor. And while I'm sure I will change things up equally often in this home, here are some of my current inspirations.


What is your mantle type?
xoxo

copyright Hiking in Stilettos